2009/02/25
2009/02/22
Blender basic animation tutorial.
There are many different ways to do an animation. I'll tell you the one I find easiest.
1. Where it says "SR:2-model" (on the bar near the top.) click the arrow button and select "SR:1-Animation". Three more sub windows will appear.
2. On the sub window below the 3d view click the red circle button a drop down list box will appear beside it. click its arrow and choose "Add/Replace keys"
3. If you move, scale or rotate an object (by object I mean object, camera, lamp etc.), a lines will appear in the far right window, the "IPO curve editor" The object is now set to be at that position, scale and rotation for the currently selected frame. The current frame is shown on the "buttons" window and the "time line" window as a number (probably 1 at the moment) with an arrow either side of it. It is also shown as a green line on the "ipo curve editor".
4. Move forwards a few frames, the left and right arrows go backwards and forwards (respectively) by 1 frame, the up and down arrows, by 10.
5. move, scale, or rotate the object again, to set its ipo curves for the new frame. You should see that the "curves" are no longer straight lines, but curves, constrained to two points.
6. keep doing this until you've told the object how it's meant to move for the entire animation.
7. if you want to change the length of the animation change the number in the "start:" or "end:" buttons.
8. you can click the play button, or press Alt and A to play back the animation. To get the best idea of ho it'll look rendered, set the view to camera before hand.
Ipo curves can be selected and edited in a similar manner to meshes.
Rendering an animation.
1. In the "render" menu at the top there is an option, render animation, click it. A window will appear and render each frame of your animation. the frames will be saved as jpegs in the default directory. if something's not right, press Esc to quit the animation.
2. to change, or find out, the directory it saves the renders to go to the "Scene" tab in the buttons window (or press F10). The first directory selector in the little panel on the left shows where it saves the renders.
3. To save the animation as a video file rather than a series of pictures, look to the little panel on the right of the buttons sub window. Where it says Jpeg, click the arow and change it to a video format. I tend to use AVI Jpeg.
4. Now if you render the animation it'll save it as a single video file in the selected directory called something like "001-250.AVI", you're now ready to do what ever video processing you want, or just upload it straight to you tube.
There are far more complicated things you can do with ipo curves and animation, but this should be enough to get you started.
If you have any questions, don't hesitate to ask.
Good luck.
2009/02/08
2009/02/05
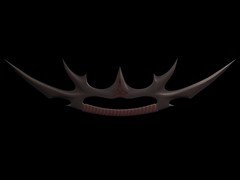
Star Trek Klingon Sword Used in Colorado Robberies
This article was posted on "Nowpublic"by TFleming.
link
He asked if he could use my sword of Kahless to illustrate a bat'leth, I naturaly accepted, so there it sits.
link
He asked if he could use my sword of Kahless to illustrate a bat'leth, I naturaly accepted, so there it sits.

2009/02/04
CK-42 Hercules
This is an article I wrote for a piece of coursework.
Westbourne CK-42 Hercules
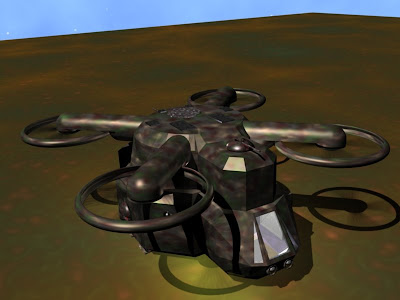
The Earth military have just been treated to the latest heli-shuttle designed by “Westbourne Aerospace TM”. The Hercules is designed to accommodate 6 people in relative comfort for an indefinite length of time for prolonged survey or reconnaissance mission. Universe Now got a good look inside the very first production model of the CK-42.
The CK-42 Hercules features four computer controlled rotors, each of which has enough power to lift the entire craft from the surface of the earth. Together they can apply a force of over 1,200kN in Earth's atmosphere.
Each rotor is powered by a powerful electric motor in the hub, with a back up coil accelerator in the rim. This arrangement makes the rotors so powerful that they can function in an atmosphere two thousand times denser than air. This means you can literally fly one of these under water.
For space travel the shuttle uses four uni-directional class 4 ion engines, one in the hub of each rotor. This lets the shuttle achieve escape velocity when the atmosphere gets too thin for the rotors.
This odd engine arrangement means that when in space the quickest way to fly is up relative to the craft, which takes a while to get used to. But this does have the advantage of giving you accelerational A.G..
For manoeuvring, the Hercules uses a fairly standard array of ion jets. The computer control system makes manoeuvring a breeze.
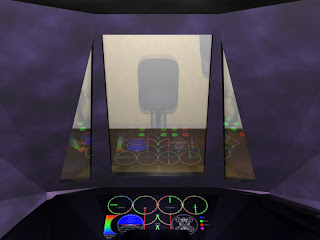
The cockpit houses a simple but effective display for the main HUD. There is also a secondary console to the right for navigation sensors etc.
The Hercules is fitted with the brand new “Plasma-tech” P100 torus fusion reactor. This reactor can provide a constant supply of nearly one gigawatt, and can store enough deuterium to last 10 years at maximum capacity.
One of the things we were especially impressed with was, oddly enough, the lights. I know it's an odd thing to mention, but these are no ordinary lamps. The lights are small, shiny black balls on the ceiling of each room. When we first boarded the Hercules we said 'lights', and expected to see these balls illuminate, but we didn't. Instead a softly glowing ball of light floated motionless just below it. This fascinating piece of technology was a holographic lamp. The really clever idea is the ability to manipulate the light. The computer detects your hands and moves the lamp as if you were holding it. You can even pinch it in two hands and split one lamp into two. The lamps can also be controlled more conventionally using the wall panel. There were hundreds of pre-set lighting patterns, all of which can be edited by moving the lamps around. I was surprised how long we spent, and how much fun we had, throwing insubstantial lights around.
Fun and flying aside, this is still a serious military vehicle. It is armed with two permanent RT20-12B machine gun turrets, and two more that can be swapped for other equipment. With this armament the Hercules is capable of defending itself, but not much use as an assault craft.
The skin of the CK-42 is made of military standard adaptive camouflage material. This means that as usual with military craft you can change colour with the touch of a button, or have it change automatically as you move to new locations.
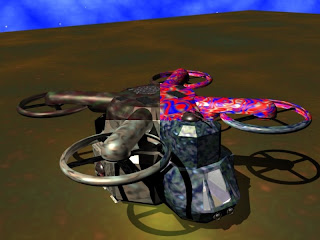
Three different default camouflage settings, jungle, desert and water, And also one we designed, just for fun.
The Hull is also extremely durable and could easily cope with pressures found even in the deepest of Earth's oceans. (I really want to use one as a submarine.)
There was a cabinet for personal armament, particularly the RS8-6 Feretti machine gun (which we reviewed in last month's issue of Universe now).
In the rear airlock there are clamps for the storage of up to four light reconnaissance motorbikes. But we found this left very little room when full.
Another clever feature are the magnetic docking clamps on the roof. These let you clamp onto the outside of a larger starship to gain 1G from its rotation. Or you can even dock two together and spin them to give you 1G, if you happen to have a second Hercules, that is.
Personally I can't wait until the civilian model comes out; my old Ck-36 Eagle feels like a little push car compared to this. The only real thing I'd mark it down on is the shape, Who wants to fly around in something that looks like a plucked turkey? Well, I guess I do now.
I give this craft an appreciable 9 out of 10, mainly losing points because it's a flying brick.
9/10
The good:
Ridiculously powerful engines
Some clever features such as the lights and the clamps.
The best on-board computer system we've ever seen.
Modular weapons systems allow easy conversion for other purposes.
Can carry up to four motorbikes, though this does make the aft airlock nearly unusable.
The bad:
It looks like you might serve it at Christmas
The beds are too small and uncomfortable.
The default wall colour's purple!
It'll set you back C28,000,000!
Clark Jameson.- Universe Now 2337-08-20
And here's the latest video of it, with a few more kinks ironed out.

Westbourne CK-42 Hercules
The Earth military have just been treated to the latest heli-shuttle designed by “Westbourne Aerospace TM”. The Hercules is designed to accommodate 6 people in relative comfort for an indefinite length of time for prolonged survey or reconnaissance mission. Universe Now got a good look inside the very first production model of the CK-42.
The CK-42 Hercules features four computer controlled rotors, each of which has enough power to lift the entire craft from the surface of the earth. Together they can apply a force of over 1,200kN in Earth's atmosphere.
Each rotor is powered by a powerful electric motor in the hub, with a back up coil accelerator in the rim. This arrangement makes the rotors so powerful that they can function in an atmosphere two thousand times denser than air. This means you can literally fly one of these under water.
For space travel the shuttle uses four uni-directional class 4 ion engines, one in the hub of each rotor. This lets the shuttle achieve escape velocity when the atmosphere gets too thin for the rotors.
This odd engine arrangement means that when in space the quickest way to fly is up relative to the craft, which takes a while to get used to. But this does have the advantage of giving you accelerational A.G..
For manoeuvring, the Hercules uses a fairly standard array of ion jets. The computer control system makes manoeuvring a breeze.

The cockpit houses a simple but effective display for the main HUD. There is also a secondary console to the right for navigation sensors etc.
The Hercules is fitted with the brand new “Plasma-tech” P100 torus fusion reactor. This reactor can provide a constant supply of nearly one gigawatt, and can store enough deuterium to last 10 years at maximum capacity.
One of the things we were especially impressed with was, oddly enough, the lights. I know it's an odd thing to mention, but these are no ordinary lamps. The lights are small, shiny black balls on the ceiling of each room. When we first boarded the Hercules we said 'lights', and expected to see these balls illuminate, but we didn't. Instead a softly glowing ball of light floated motionless just below it. This fascinating piece of technology was a holographic lamp. The really clever idea is the ability to manipulate the light. The computer detects your hands and moves the lamp as if you were holding it. You can even pinch it in two hands and split one lamp into two. The lamps can also be controlled more conventionally using the wall panel. There were hundreds of pre-set lighting patterns, all of which can be edited by moving the lamps around. I was surprised how long we spent, and how much fun we had, throwing insubstantial lights around.
Fun and flying aside, this is still a serious military vehicle. It is armed with two permanent RT20-12B machine gun turrets, and two more that can be swapped for other equipment. With this armament the Hercules is capable of defending itself, but not much use as an assault craft.
The skin of the CK-42 is made of military standard adaptive camouflage material. This means that as usual with military craft you can change colour with the touch of a button, or have it change automatically as you move to new locations.

Three different default camouflage settings, jungle, desert and water, And also one we designed, just for fun.
The Hull is also extremely durable and could easily cope with pressures found even in the deepest of Earth's oceans. (I really want to use one as a submarine.)
There was a cabinet for personal armament, particularly the RS8-6 Feretti machine gun (which we reviewed in last month's issue of Universe now).
In the rear airlock there are clamps for the storage of up to four light reconnaissance motorbikes. But we found this left very little room when full.
Another clever feature are the magnetic docking clamps on the roof. These let you clamp onto the outside of a larger starship to gain 1G from its rotation. Or you can even dock two together and spin them to give you 1G, if you happen to have a second Hercules, that is.
Personally I can't wait until the civilian model comes out; my old Ck-36 Eagle feels like a little push car compared to this. The only real thing I'd mark it down on is the shape, Who wants to fly around in something that looks like a plucked turkey? Well, I guess I do now.
I give this craft an appreciable 9 out of 10, mainly losing points because it's a flying brick.
9/10
The good:
Ridiculously powerful engines
Some clever features such as the lights and the clamps.
The best on-board computer system we've ever seen.
Modular weapons systems allow easy conversion for other purposes.
Can carry up to four motorbikes, though this does make the aft airlock nearly unusable.
The bad:
It looks like you might serve it at Christmas
The beds are too small and uncomfortable.
The default wall colour's purple!
It'll set you back C28,000,000!
Clark Jameson.- Universe Now 2337-08-20
And here's the latest video of it, with a few more kinks ironed out.
Subscribe to:
Comments (Atom)


